
Quickstart
In a few minutes you will install lazybox, launch it, open a workspace with a live embedded terminal, and send one reviewed instruction to two sessions. Those wins cover the core loop: start work in isolation, reuse a reviewed workflow, then coordinate a small fleet from the inbox.
For a real GitHub inbox you need the GitHub CLI, logged in. Run
gh auth login once — lazybox reads your token from gh auth token. The
zero-setup --test mode does not need GitHub or gh.
1. Install
Section titled “1. Install”Install with Homebrew (macOS arm64/x86_64 or Linux x86_64):
brew tap AntoineToussaint/lazybox && brew trust AntoineToussaint/lazybox && brew install lazyboxThis drops a lazybox binary on your PATH. Skip to Launch.
Build from source instead
Section titled “Build from source instead”Prefer to build it yourself, or hacking on lazybox? You will need Rust 1.88+ and a C compiler (lazybox bundles SQLite). On Debian/Ubuntu also install libc++:
sudo apt install build-essential pkg-config libc++-dev libc++abi-devThen clone and build:
git clone https://github.com/AntoineToussaint/lazybox.gitcd lazyboxmake setup # one online preparation of Zig, Ghostty, and Cargo cachesmake release # optional optimized build; strictly offline after setupmake setup verifies the pinned Zig archive, caches the pinned Ghostty source,
fetches the locked Cargo graph, and prebuilds the native terminal dependency.
It is the only step that requires network access. Later make release runs
Cargo with --offline --locked, including after cargo clean or from another
worktree sharing the same cache.
2. Launch
Section titled “2. Launch”If you installed a prebuilt binary, just run:
lazyboxFrom a source checkout, use make run instead (it builds, then launches).
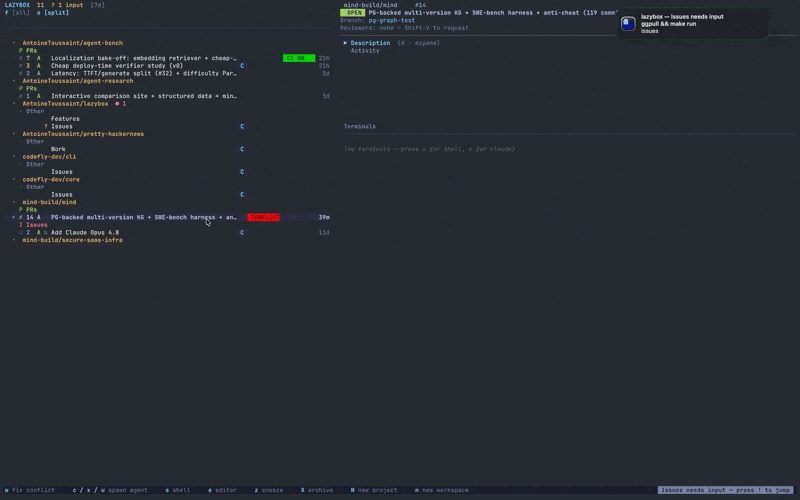
On first launch lazybox runs a short setup wizard to pick up your GitHub credentials and detect installed agents and editors. When it finishes you land on the main screen: the sidebar inbox on the left lists your workspaces grouped by repo, and the larger pane on the right shows activity for the selected row.
3. Your win: open a workspace and spawn a session
Section titled “3. Your win: open a workspace and spawn a session”In the sidebar:
- Press
j/kto move the selection to a workspace. - Press
Enterto open it. - Press
w wto put your default agent to work — orsfor a plain shell if you’d rather not start an agent yet.w wneeds the agent’s CLI (e.g.claude) on yourPATH;salways works. To pick a specific agent, pressafor the agent menu:a cClaude Code,a xCodex,a uCursor.
A terminal pane opens, embedded right inside lazybox, running in that workspace’s own git worktree. Type a command; it runs in the worktree. That’s the win: lazybox gave the task an isolated worktree and a live terminal, and you never left the inbox.
To get back to the sidebar from a terminal, press ]] (two presses) then q
— ]] opens a small command menu, and ]]q exits to the sidebar.
4. Your daily fast path: send a reusable workflow
Section titled “4. Your daily fast path: send a reusable workflow”If you started an agent above, wait for its contextual task to finish, then keep the terminal focused:
- Type
]]sto open the categorized snippet picker. Move with↑/↓; the right pane previews the complete instruction and shows whether it is built-in, global, or from the directory where lazybox was launched. - Type
rev. The built-in review workflow is a unique key, so lazybox sends and submits it immediately. The whole action is]]srev; there is no extraEnter. - After the agent finishes, open
]]sagain.revis selected in the Recent group, so the workflow is now oneEnteraway. Recent persists across lazybox restarts.
Back in the inbox, the workspace now carries a ]1 badge: one recently
distinct snippet workflow has been sent there. That bounded history is
persisted per workspace, so it remains a quick progress cue while you juggle
several agents.
5. Coordinate two workspaces at once
Section titled “5. Coordinate two workspaces at once”Now experience the fleet workflow instead of visiting each terminal:
- Make sure the sidebar has at least two workspaces. In
--testmode, pressx nto create a second, repo-free floating workspace. In a real inbox, choose rows from two different repo groups. - Start a coding agent in each workspace with
w w, returning to the sidebar with]]qafter each spawn. - Focus the first row and press
v, navigate to the other row, and pressvagain. The marks survive navigation and the selected count becomes2. - Press
Shift-B. Confirm both workspace names in the target recap, choose the built-inauditsnippet, and edit its pre-filled body into the exact instruction both agents should receive. To try the free-text path instead, pressCtrl-Fin the snippet picker. - Submit once. The footer reports which live sessions were queued, and each
confirmed delivery updates Recent and that workspace’s
]Nhistory.
No agent CLI available? Start a plain shell in each workspace with s, choose
the Ctrl-F free-text path, and broadcast a safe shell command such as:
printf 'broadcast reached %s\n' "$PWD"That exercises the same multi-workspace flow through direct shell delivery. The full multi-agent orchestration guide covers mixed agent/shell selections, skipped session-less targets, retry semantics, and per-workspace history.
What next
Section titled “What next”You opened live sessions and coordinated them. Continue with the Core workflows to see how lazybox keeps the correct task folder, agent session, Git changes, and GitHub state together all the way through a real workflow.
Then wire up a real repository:
- Add a repo so your own pull requests flow into the inbox.
- Start from an issue and keep your session in the PR to carry a running agent forward when its implementation pull request appears.
- Use snippet workflows to create, scope, and broadcast the repeatable instructions your agents use every day.